Monday, October 31, 2011

1930's Reproduction Dresden Plates

These are the blocks I've been working on at the hospital while mom was recuperating. There are 16 of them now so I think I'll do 4 more. Twenty (4x5) would make a nice quilt for a child. The blocks get trimmed down to 8" finished size. The dresdens are done with paper pieces cut in that petal shape. Sure makes it easy and it's all hand sewing. Perfect for a take-with project.
I'm still deciding on sashing and setting. I know it's hard to tell in these pictures but the background is a very pretty aqua. I have red and white gingham, solid red plus more of the red and white polka dot that is in the centers. Somehow I want to combine all of those in the sashing design....well, we'll see...

While I was going through the camera taking the pics of these blocks, I found a picture of my mom and my daughter Jenn from this summer. Just before all of these problems started, mom visited me up north. I took this pic of them at the castle.


Mom came home from the hospital today and is doing well. I head home to Charlevoix tomorrow. I'll be playing catch up with my outside work, inside work and sewing... but I can't wait... I miss my bed, my tub and mostly MY SEWING ROOM!

Friday, October 28, 2011

Handsewing At U of M

Lots of hand sewing going on right now... lots of waiting. I'm at U of Michigan waiting for my mom to have a feeding tube put in. She's still having trouble swallowing. They haven't allowed any food or drink for a couple of days now. Hopefully she'll be getting the tube in and within 24 hours will have something in her stomach. Her spirts are amazingly good... I don't think I would have a smile on my face like she does. I'd take her pic but she'd hit me over the head. We curled her hair for the surgery today... want her to look nice for the ride down the hallway.


I'm working on an English paper piecing project I started with my daughter in Shipshewana. It's a small daisy or dresden appliqued on a 9" aqua block. I'm using 30's repros of course...my fav. I have 12 blocks done and am just going to continue until I get home. If I have 16 done then the quilt will be for a baby... If I get all 36 done, it'll be a twin... we'll see.


Thanks for all the well wishes and prayers... I know it's helping.


Big Hugs to Rebecca... hope all is going well with Gregg.

Saturday, October 22, 2011

UFO list going down

I've had a chance the last few weeks to work on my UFOs. This first one was going to for a gift but I changed my mind. I'm donating to mom's church for their auction. Hope it's gets them a few dollars. I used lots of 6" squares that I traded with my friends from our old forum, Block Central... sure miss that place. The backing was a sale fabric from Hearts to Holly Quilt Shop. It was bright and had most of the colors from the top. If anyone is interested in how I made this quilt (VERY EASY), go to this page: http://northerndeb.blogspot.com/2010/03/making-quilt-from-6-inch-charm-squares.html of my blog.Now here's the quilt that started off being the donation quilt but changed to the gift quilt. The blocks were made by a friend up here in Charlevoix. She didn't have any plans to use them and said if I could make use of them, go ahead. Well they turned out much prettier than I expected. Used plain white for every other block, set them all on point then added a large white border. I had the navy and white floral background in my stash. The batting was in my stash also.
Both of these quilts were quilted on my home machine.... nothing fancy, just a meander/stipple pattern.
I finished up the sample quilt, Aunt Grace's Garden Party and that turned out really nice too. I don't have a picture yet but it's hanging up in the quilt store. It's going to be a block of the month starting in Nov. If anyone wants to make that one, give the store a call.


Now, for anyone wondering how my mom is doing... well, Al and I are downstate at mom's right now. The church auction is tomorrow and I'll be going with my sister, my niece and some of mom's friends. Mom is not up to going since she just got out of the hospital. Her voice is starting to come back, sounds a little stronger to me. She's fed up with her thickened liquids but knows she doesn't have a choice for right now. We all hope that her throat will get back it's ability to swallow. Mom has her bypass coming up in the beginning of November and we're all anxious for that. The hope is that this will be the fix that takes care of the stroke symptoms. Thanks to all of you that have her in your thoughts and prayers.


This past week was Grandma's birthday. She was 103!!! A few of you have asked me how she's doing. Grandma is just like the enegizer bunny...just keeps going. Her vision is gone is one eye and the other is almost gone. She's been legally blind for years. She seems to get around the nursing home just fine though... uses a walker and feels her way down the hallways. I made her a Charlevoix Apple Cake... the same ones we sell every fall at the apple fest. Anyone still making those? (I posted this recipe on block central a few years ago). I know a few husbands that are addicted to this cake ...right Jenell? LOL This is one of grandma's favorite cakes.


Well, off to bed. Busy day tomorrow.

Friday, October 7, 2011

Barn Quilt

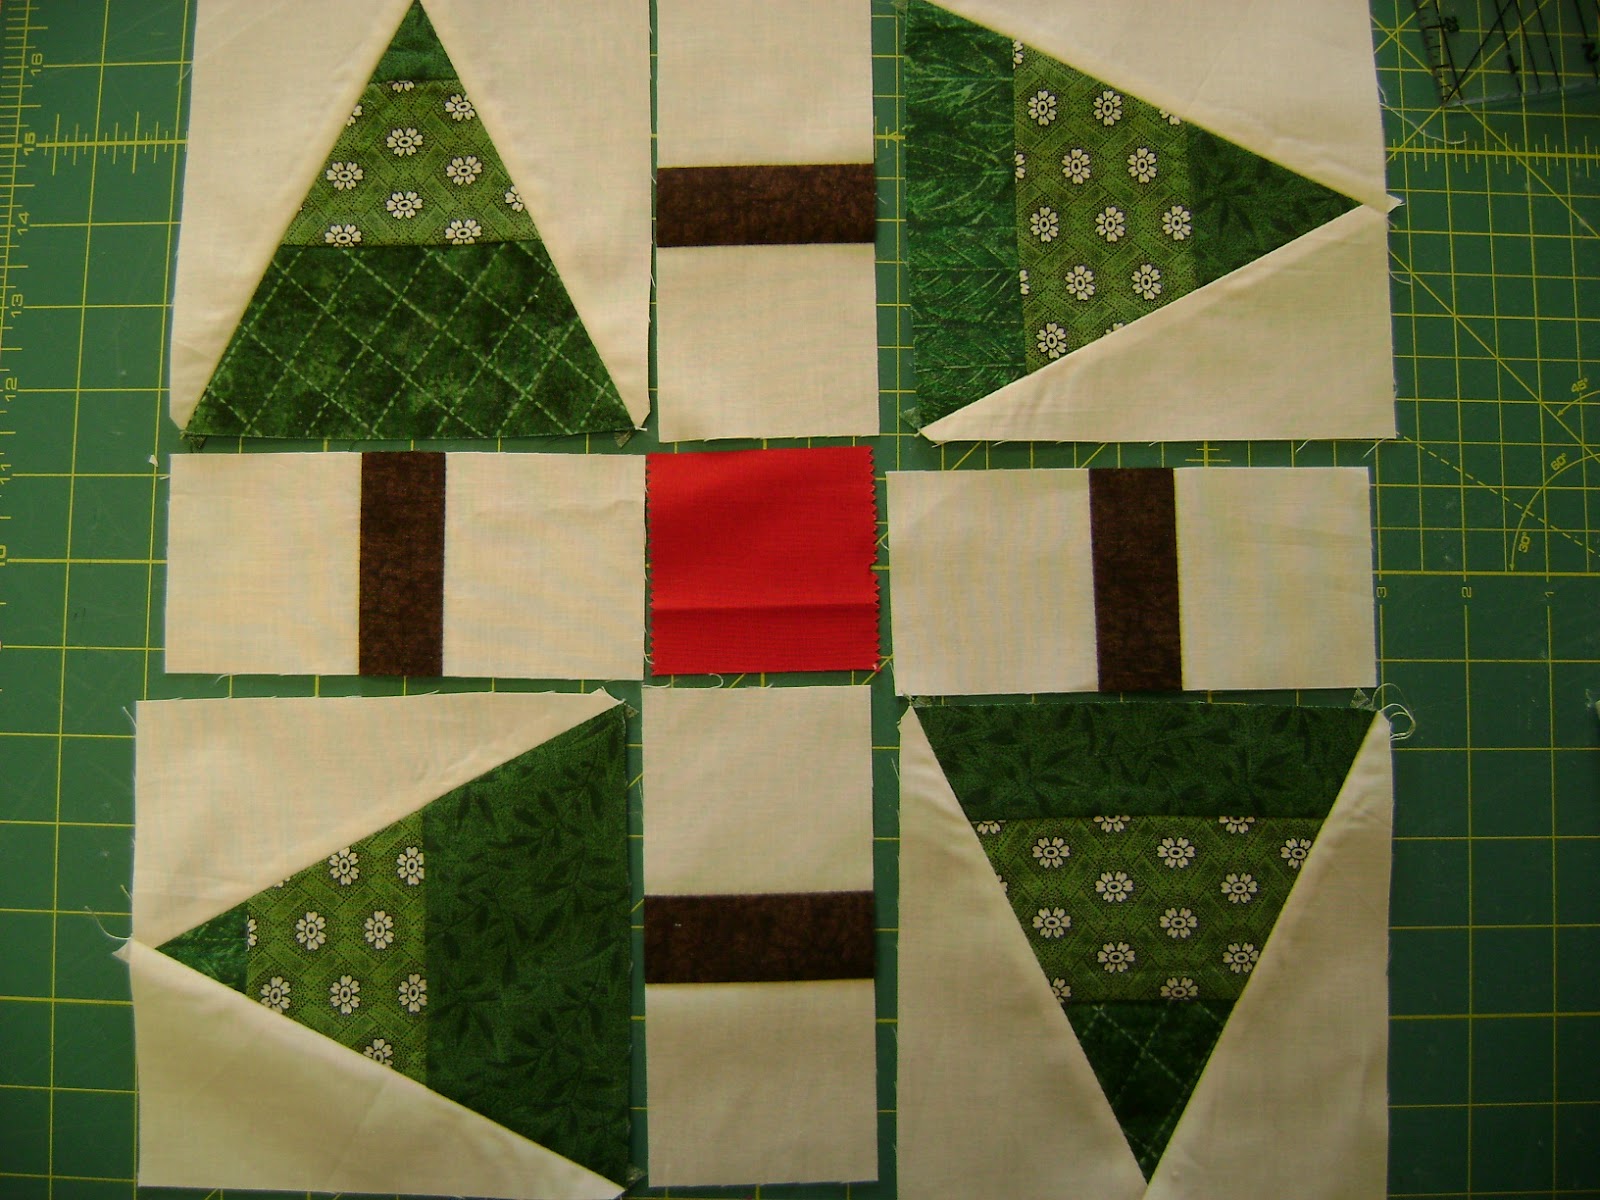
Al has been busy painting his barn and adding a little something for me. Here's a picture of Al painting our barn quilt block. This is called "Pat's Pines" named after my mom, Pat. Al painted this while I worked and was busy with other things. Didn't he do a great job?! I'm going to add the directions to this block (12") the next time I'm online. It's really easy if you have the Tri-rec tool.

UPDATE (4-16-12):
I've stiched up the Pat's Pines block so that I can post a tutorial for anyone that would like to make it. You'll need to purchase the Tri Tool/ Rec Tool. These come together and are wonderful acrylic templates for making all kinds of blocks and rows that use triangles.

For my pine trees, I used up scraps of dark green. I had lots of 2-1/2" strips so I stitched three together to form a long 6-1/2" strip. I trimmed this to 5-1/2" wide. If you'ld like you can just cut a 5-1/2" strip of fabric. The strip length I used was half of a WOF (width of fabric) or about 21" long.

Pat's Pines Block Tutorial
Fabrics:

Green: (1) 5-1/2" wide strip (mine was a scrappy strip)
Background: (1) 5-1/2" wide strip  AND (2) 2-1/2" strips
Brown: (1) 1-1/2" wide strip
Red: (1) 2-1/2 x 2-1/2" square


From the strip of green, cut FOUR trees by using the Tri Tool. Line up the 5-1/2" line at one edge, the top should line up on the other side, and cut the two angles. Flip the tool to the opposite end to cut another. Repeat cutting until you have 4 trees.
Fold the 5-1/2" background strip in half, right sides together and cut 8 triangles using the Recs Tool. Line up the 5-1/2 line on one edge and cut the two other sides. There is a TINY little extra cut at the tip that you cut also. Seems like a little thing but this little clipped point helps to line every thing up for sewing.
Using one of the "trees" and two of the background triangles, stitch the sides of the tree to for a 5-1/2" square block.
Here's that extra cut you made with the Rec Tool. This makes everything line up nicely.

Here's how the second seam line up. You should be stitching your 1/4" seam so that you stitch right off the end in the V made by the two pieces.
Now stitch together one 2-1/2" background to the brown strip and then add one more 2-1/2" background to SANDWICH the brown between them.
Cut off FOUR 2-1/2" slices.
Lay out all of your pieces to look like the picture above. You have 9 pieces. Put this together as you would any 9-patch block.
On any 9-patch block, I press the seams out for the outer rows (top and bottom) and in for the inner row. This helps to "lock" my seams together when I complete the block. Here's my idea for finishing up the quilt. I would probably put a sashing between my blocks... maybe a 1-1/2" to a 2-1/2 wide....then border the whole thing a few times. The one below would be a lapsize... use 20 blocks (4x5) or more for a bed size.

Friday, July 8, 2011

A new mug rug... or is it a pot holder?

Here's a new pattern I came up with to make a mug rug or potholder using a few paper hexagons. (See bottom of this post for how-to)...
This month I have a class at Hearts to Holly teaching English Paper Piecing. Thought this would be an easy project for someone who wants to give it a try but not make a HUGE quilt.
Wouldn't this be a nice baby quilt if maybe a dozen or so of these blocks were joined together? I just might have to make one...
Yeah... so I'm hooked on paper piecing... I really enjoy it... It gives me something portable to work on when Al and I are traveling plus something to take to "chattertime" on Friday mornings. Right now I'm doing Seven Sisters (with diamond paper pieces), a set of dresden circle blocks that are in 30's on aqua background, and a block of the month sample for the quilt shop that has paper pieces in parts of it.

So the past few weeks (when I wasn't sick in bed), I worked on the new block of the month from Moda that the lqs got in. It's going to be a store sample and it's coming along nicely. When I get a little farther along I take a picture. It's all in 30's, which I love, and mostly in primary colors. The challenging part of this quilt will be the scalloped border but it's also one of the things I like best about it.

For the Mug Rug:
I purchased some 1" (I think) hexagon papers (www.paperpieces.com or your local quilt shop).

Stitch 7 together to form the hexagon flower (if you need a how-to on English paper piecing, www.paperpieces.com has one. It's under the tab BASICS). I used dots in the center with solid and gingham alternating around the center.

Cut a square backing piece about an 1-1/2" larger than the largest measurement of the paper pieced flower. This will allow for seam allowance. I used aqua solid.

Applique the flower to the background then flip it over and carefully cut away the background that is UNDER the flower but no closer than 1/4" to your stitching... This will allow you to take out the papers.

Press.

Cut 4 border pieces the length of your background block and 1-1/2" wide. I used my dots again. 
Cut 4 corner pieces 1-1/2" square. I used a 30's repro print.

Attach a border piece to each side of your center.
Attach a corner piece to each short end of the two remaining border pieces, then stitch these on the top and bottom of your center.

Your mug rug FRONT is done.
 
Now all you have to do is find a backing scrap, a batting scrap, quilt it and bind it.

Sunday, July 3, 2011

Shipshewana Quilt Show

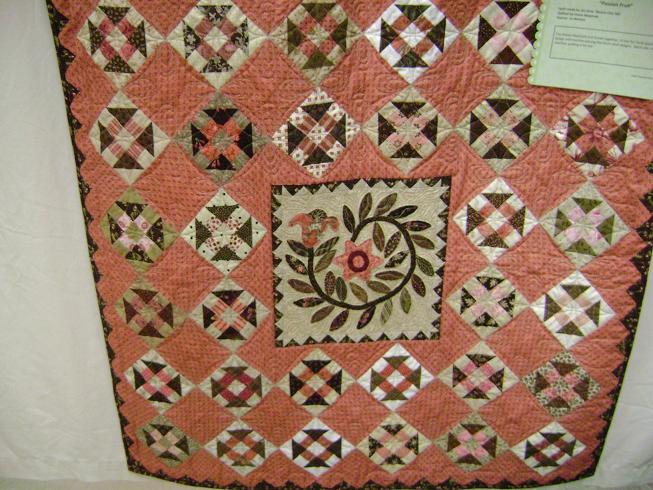
I'm posting just a few pictures of the many I took on my trip to Shipshewana... these were just outstanding! There were so many well done quilts... such nice handwork. The one below is a dear jane... I've been wanting to start one of these for years. It's just another of 100's on my "someday" list.


This quilt should have had a blue ribbon but didn't and I really don't understand why. She made all those cute little quilts, really mini quilts, that are hanging in this quilt show quilt. The one next to the barn is a yoyo quilt with REAL yoyos... tini tiny ones! And the quilt with the scotty dogs are all VERY tiny scotties pieced or appliqued in. JUST AMAMZING!


This one had me with the hand quilting. The quilt is beautiful but the handquilting is so tiny and straight and CLOSE together.


And here's my favorite of the show (yes, it got some ribbons!). The quilting was PERFECT and so pretty... someone has a great eye for color.


There were many more but I'm trying to post this in a hurry (my computer is about to die and I'm running out of time). Enjoy!


Thursday, June 23, 2011

Playing around with some new blocks

The color doesn't show very well but these are 30's repros on an aqua solid. Lisa and I started a couple of blocks after visiting Yoder's. We picked up some paper pieces shaped like these rounded petals. The pack comes with 16 petals and 2 circles for the center. This gave us something to work on in the evenings in Shipshewana. Our fingers were itching to play with our new fabrics :) I think we bought about 25 new pieces of 30's fabrics.


Tomorrow when I get home I plan to post pictures of the quilt festival. We saw some wonderful quilts. The handquilting was AMAZING! While eating our lunch at the festival, we shared the table with some talented ladies. One was experienced in dyeing her own wool so she gave us lots of tips... she teaches a class in wool so I guess you could say we got a free class! We're back in lower Michigan now... Lisa is back home and I head back up north tomorrow... And we're both so tired (but happy!).


Monday, June 20, 2011

A present from my daughter

When I went downstate today to pick up my daughter, Lisa, she had a present for me. I had admired the doll she made that sits on her sewing room shelf.... she made me my own dolly!


Isn't she adorable? I took her on our trip to Shipshewana.


We've already purchased fabric even though the quilt shops are closed. Stopped at the anique store that was open for 40 more minutes. We sped through it, zooming in on quilts and old quilt fabrics. I found 3-1/2 yards of a vintage fabric for 12 dollars! I love it and now have to figure out where to use it. Lisa bought a bag of scraps for 8 dollars and here's some of what was in it:


She found a bunch of old quilt blocks in the bag and one of them had the newspaper still attached to the back. We read the paper and found out it was from the early 30s. The block is not well done but she loves the fabrics in it and seeing the old paper. She's going to keep it just to have it as a piece of history. The top three blocks in the picture above are going to be put into a quilt. The middle one will fit in a farmers wife quilt. The basket needs a handle and to be appliqued onto a back ground. The dresden fan is only 1/2 completed so she plans to finish it up and maybe make more that match. The bag had lots of fabric scraps too. Lots of fun for the price :)

Sunday, June 19, 2011

The Quilt Show - Part II

Here are some more of my favorites: Lisa, I thought you might like this one... has your colors:


Love the birds....


Lisa, another one for you to check out... those are yoyos appliqued on the vines with buttons in the center!


And this is one that I did like that much when I was close up but when I stood far away the pattern showed up... I LOVE it!


And here is the BEST OF SHOW! Those are all little pieces... and all the points are perfect on the triangles and corners... all stitched in the ditch.. IN EVERY DITCH!!!!! Amazing!


This one didn't have a ribbon... not sure why... it was very well done. I loved the colors.


Here's another with wonderful colors:


Another beautiful blue quilt... I should have gotten a picture of the one to the left of it... I dont remember looking at that one. Looks really pretty from the little bit I can see...

And finally here's a pretty appliqued quilt:

There were a few more pictures but quite a few were blurry... Hope you enjoyed the pictures.


The Quilt Show -Part 1

Well, I sure did enjoy the show!! BEAUTIFUL quilts :) This one was my favorite and the one I thought SHOULD have gotten best of show (but what do I know)... It was absolutely amazing. Check out the double edging... cream and burgandy scallops on all four sides! and all those beautiufl scallops that are appliqued in the vine borders. Well, I give this one MY viewers choice award. So, you're wondering how I did? WELL... here it is... hung next to my friend, Marg's quilt, and there's our blue ribbons :) Yup, I was jumping up and down (and I'm not exagerating at all). My quilt was in the wall size quilt group... it was just over 24" square. My friend's quilt was a little smaller and in the mini quilt category. Her's is amazing... each of those colors in the braid is is separated by a little black satin ribbon stitched in! And her applique work is perfect. I didn't get a picture of the purse just below my quilt, wish I did... it was the cutest! Sparkles and beads and pretty fabric.

Here's a quilt I wanted my sister to see. It's an adorable dresden fan quilt.... and I think it's vintage. I like the yellow centers that match the outer border.


This is another old quilt...well, the top at least. The lady bought the top and finished it up. Isn't the edging nice?


This is another of my favorites... I didn't see a ribbon on it (maybe they didn't want it judged?) but I thought it deserved one and I told the maker that. This is now on my list of someday quilts.

Well, that's all I could upload at a time so I'm going to post this and put up some more. I need to show you the best of show quilt... done by a man!!! Yes! Pieced and quilted. He's a wonderful longarmer.

Friday, June 17, 2011

Quilt show in Petoskey

Today is the start of our quilt show in Petoskey Michigan. It's also on tomorrow if you're in the area. It'll be at the Knights of Columbus Hall (over by Burger King). I have one quilt entered... I meant to enter more but this has been a BUSY spring and summer. Maybe next time...


SOOO... this is the quilt I entered. This is a picture I took before it was quilted and bound. I'm going to the show tomorrow and I'll take lots of pictures to share with all of you.

Latest projects

  I've been working on 4 quilts lately. This yellow one was completely finished a fews days ago.  This "square in a square " q...