You ever have a party or big get-together and just before everyone is supposed to arrive you decide to throw together a fast decoration? Well, I wanted to have a candle in the middle of the island where I was serving food. Checking out PINTEREST, I found some nice ideas using dried beans, peas, nuts, cranberries, etc surrounding a candle. Figuring this is a super quick and easy project, I got my pie weight dried peas, some dried northern beans and a bag of cranberries.
Well, when I turned my back for JUST A SECOND, the bag of dried pies dumped itself ALL over the kitchen floor... this was just minutes before the first guest arrived. I'm probably going to be finding dried peas everywhere. Glad I did it though, most of my guests loved this centerpiece. This is good for Christmas since it's red, white and green.
Nothing to post this time about quilting, today was all about cooking, cleaning and baking. Yesterday, I did do a little stitching, made three quick 10-minute table runners for the party....just didn't get a picture of them. Hearts to Holly has quite a few of these kits and they really are 10 minute sewing projects.
Monday, November 12, 2012
Sunday, November 11, 2012
Working with Marmalade and discussing rulers...
Daughter Jenn and I are both working with the Marmalade line of fabrics today. She's making the baby quilt in the picture above...isn't it CUTE?! She's putting a soft green polka dot flannel on the back so that it's really cozy. This is a gift for a friend of hers (no she's not pg YET).
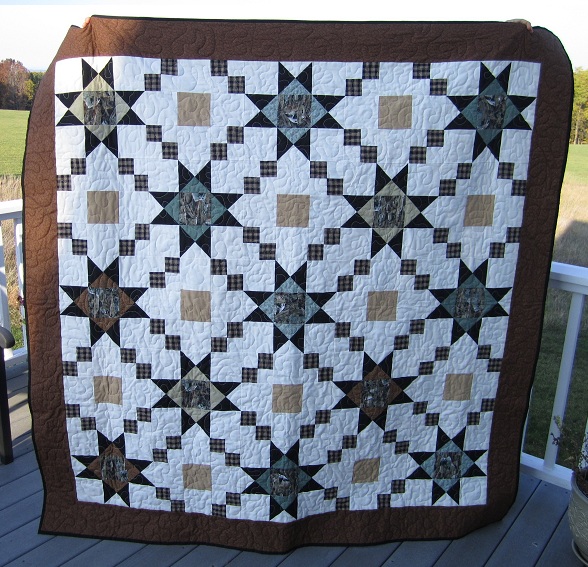
One of the other three projects I'm working on currently is this outdoorsy lap quilt for Al's friend. He let Al stay with him in Colorado when Al went there to pick up a sewing machine for me. Al got sick in the mountains... altitude sickness and his friend took really good care of him....so he needs a nice thank you. There will be log cabin blocks on all the sides and then a beige border after that.
This is my project with Marmalade... it's a cute pattern called "Spools". It'll be a shop sample at Hearts to Holly soon.... just waiting for some solid gray/tan to arrive for the spool bottoms. I LOVE THIS LINE!
One of the other three projects I'm working on currently is this outdoorsy lap quilt for Al's friend. He let Al stay with him in Colorado when Al went there to pick up a sewing machine for me. Al got sick in the mountains... altitude sickness and his friend took really good care of him....so he needs a nice thank you. There will be log cabin blocks on all the sides and then a beige border after that.
At chattertime.. or was it at guild?... we were talking about how many rulers/templates we own. When I got home I decided to count them and I found I have over 35! Now I didn't do this all in one or two years... I've been quilting and buying these things since the 90's. Some of them are out of date and need to be thrown away. Rulers have come a long way.. the quality is much better now... the plastic is much stronger... and now with the ones I buy in the quilt shop, there's those grippies on the bottom built right in! So how many rulers so all of you own? And do you use them? I use probably 90 percent of mine regularly.
Tuesday, November 6, 2012
Red and Beige Double 4-Patch is finished
Yesterday I finished up the quilting for this UFO and promised to show the back of it. This is using the leftover "opposite" blocks. The original plan was to make two quilts...opposites... but this got stuck in the UFO pile and wasn't touched to it's better to be a back than nothing.
I really like the design that the 4patch creates and that may be my next quilt.. just these waves. Maybe in blues and cream?
So here's the quilt as I finished the quilting and was trying to figure out which fabric to use as binding. The darkest red was perfect... finished sewing down the binding last night! Check off another UFO from the list! This is a large lap or small twin (60x80).
Make sure you get out and VOTE today!!!!
Sunday, November 4, 2012
Stars and UFOs
The fourth of 16 star is done so that means I'm a 1/4 of the way done! :) :)
To give myself a break from this very intense piecing, I started working on another UFO. This beige and red quilt top has been done for a while and hanging in my sewing room closet. It was a quilt that was started to help clear out my over abundance of reds.. many were from the late 80's and 90's!
Today while going through the room and cleaning, I found some fabric that I bought a couple of weeks ago and then decided against for my lone star quilt. I had planned on putting a border on the above quilt but then decided I wanted it more authentic... no border... just stars. Well, the fabric was a perfect color for the quilt below.. just wasn't enough. SO, digging through some more boxes I found some blocks that were the opposite of these red and beige ones. There were enough blocks to piece two rows of them. Stitching them together and placing them between two strips of the backing, made the back large enough for this top... YEAH!! Love working from my stash! I'm pinning the quilt today and hopefully will get it quilted this week.
I'll show the back when the quilting is done. Al says I need a very dark red binding.. gonna go with his opinion... sounds right.
To give myself a break from this very intense piecing, I started working on another UFO. This beige and red quilt top has been done for a while and hanging in my sewing room closet. It was a quilt that was started to help clear out my over abundance of reds.. many were from the late 80's and 90's!
Today while going through the room and cleaning, I found some fabric that I bought a couple of weeks ago and then decided against for my lone star quilt. I had planned on putting a border on the above quilt but then decided I wanted it more authentic... no border... just stars. Well, the fabric was a perfect color for the quilt below.. just wasn't enough. SO, digging through some more boxes I found some blocks that were the opposite of these red and beige ones. There were enough blocks to piece two rows of them. Stitching them together and placing them between two strips of the backing, made the back large enough for this top... YEAH!! Love working from my stash! I'm pinning the quilt today and hopefully will get it quilted this week.
I'll show the back when the quilting is done. Al says I need a very dark red binding.. gonna go with his opinion... sounds right.
Saturday, November 3, 2012
It's not offically winter on the calendar but looking outside, that's what it looks like. This is the first snow of the season (the first one that stayed on the ground that is). That means it's time to get Christmas shopping done... it'll be here before you know it!
Time to head to work.. have a nice all... AND STAY WARM!
Thursday, November 1, 2012
Working on my stars
This quilt is slowwwwly coming together.... I have 3 of the 16 blocks done. The one block on the right looks like it has pink and purple but it's not.. they look much nicer up close. These take a LOT of patience but it's going to be my quilt so it's no rush.
Thursday, October 25, 2012
I'm starting Ellens Sewing Basket Quilt from Minick and Simpson. Some of the fabric will be Independence Trail as the pattern suggests and some will be French General and other civil war FQs I have in my stash. Also picked up a few new pieces at work today ...you know I can't go home with at least a LITTLE piece of something! ;)
This is the first block of 16 I'm going to make.... well maybe 16. I may stray from the pattern a bit because if I make 9 blocks and then make a border all the way around with 1/2 blocks, the 9 will center on my bed nicer.... we'll see..
These blocks are a bit of a challenge to make. The first attempt at this block I used the English paper piecing method but I wasn't happy with the way it was going. And, it was SLOW.
After reading a bunch of magazine articles and online suggestions, I decided that Minick and Simpson's way of doing the block was probably the easiest. I'm sure they went and tested all the different ways prior to making the pattern but I just have to do everything the hard way.... had to see for myself.
In an old copy of Quilter's Newsleter, I did find one interesting article on lone star blocks (which this is). They suggested that you draw the 9 piece diamond (8 of these diamonds make up the star block) on a piece of paper the exact size it will be before being set together... then BLOCK each section of the star to the drawn paper block. Using a starch sprayed on the diamond allows you to block the pieces so that each of the 8 diamonds is the same size. This helps ALOT! The other really good suggestion is to handle the pieces as little as possible so the bias edges don't stretch out of shape. Also press and starch your fabric BEFORE cutting so that it's a little stiff and doesn't want to stretch as easily.
So that's not all I was shopping for today. The quilt shop got in these little "Candy" sized pieces of Marmalade from Moda. LOVE THIS FABRIC! So I picked one up for someone that likes this line. Isn't it cute?!
This is the first block of 16 I'm going to make.... well maybe 16. I may stray from the pattern a bit because if I make 9 blocks and then make a border all the way around with 1/2 blocks, the 9 will center on my bed nicer.... we'll see..
These blocks are a bit of a challenge to make. The first attempt at this block I used the English paper piecing method but I wasn't happy with the way it was going. And, it was SLOW.
After reading a bunch of magazine articles and online suggestions, I decided that Minick and Simpson's way of doing the block was probably the easiest. I'm sure they went and tested all the different ways prior to making the pattern but I just have to do everything the hard way.... had to see for myself.
In an old copy of Quilter's Newsleter, I did find one interesting article on lone star blocks (which this is). They suggested that you draw the 9 piece diamond (8 of these diamonds make up the star block) on a piece of paper the exact size it will be before being set together... then BLOCK each section of the star to the drawn paper block. Using a starch sprayed on the diamond allows you to block the pieces so that each of the 8 diamonds is the same size. This helps ALOT! The other really good suggestion is to handle the pieces as little as possible so the bias edges don't stretch out of shape. Also press and starch your fabric BEFORE cutting so that it's a little stiff and doesn't want to stretch as easily.
So that's not all I was shopping for today. The quilt shop got in these little "Candy" sized pieces of Marmalade from Moda. LOVE THIS FABRIC! So I picked one up for someone that likes this line. Isn't it cute?!
Thursday, October 18, 2012
Purple and gold batik scraps
Today I'm playing a bit with some of my purple and gold batiks. With the help of a wedge ruler I was able to create these large zigzags. After making about a dozen blocks I decided to put them into a table runner.... may change my mind before I'm done but that's the plan for now.
That's it... short and sweet! :)
Tuesday, October 9, 2012
Charity quilt and a pinkish one
This is one of 13 four patch blocks I brought home from a guild meeting. We bring in orphan blocks, fabric we don't want, patterns and books that we are done with and then we share them with the other members. This block was in a bag of scraps. I found 12 4-patch blocks with the beige triangles attached and one without. I added the beige to the last 4 patch so that I would have 13 blocks (which is what I need to make the quilt turn out).
After that I added a very light creamy yellow solid so that the blocks turned on point again. Gives it a square in a square look. Going through some of my books, I found a setting that I liked... with a little adjustment.
The block below, with the solid pink and the polka dot green, will be alternating with my found blocks. The blocks are both 12" finished so with 25 blocks (12 of one, 13 of the other) I'll have a 5'x5' quilt. That probably won't be big enough so I'm thinking of adding a couple of borders, maybe some applique and then a scallop edging with the pink for binding. When I get a little farther, I'll put more pictures up.
Another project I'm working on at the same time is this charity quilt. Since I have LOADS of brights to use up I decided to put them into a child's quilt. Our guild makes quilts for children that are admitted to the hospital to help make it more comforting for them to be away from home. Going through my strips and scraps, I came across a bunch of strips from a swap we did quite a while back... on Block Central maybe? Some of my bright strips from the swap were used in other projects but I still had lots. I'm hoping this makes a small dent in the pile. The quilt needs the piano key border on three more sides and then it should be large enough.
Wednesday, October 3, 2012
Wedding picture and hitting the resale shops
I thought I would post one of my favorite pictures from the wedding... what a perfect couple! Jenns dress was all lace... and beautiful!... cowboy boots under :) The photography was done by a very talented person from TC... www.danstewartphotograpy.com.
And this cute owl cookie jar, below, is a find at the local Goodwill store (you know how I love the resale shops!). Wasn't sure what I was going to do with him so I gave the girls first dibs... Lisa says she'll give him a home. It's pretty old but no chips... just a little crazing inside. Reminds me of Jonathan Adler stuff.
Now to get down to the sewing room and do some work. I plan to clean it for a few hours, then do some repair work on a certain quilt. Maybe later, I'll get to play with a new charm pack I have. More pictures later.....
Tuesday, October 2, 2012
Ugly quilt is FINALLY quilted and done!
Not sure how many of you remember our "Ugly" fabric challenge at the Quilt and Needle (www.thequiltandneedle.com/forum) I received a fq from Pat that was outdoorsy (is that a word?) and swampy and pretty ugly ... at least to us ladies. It was the perfect fabric to inspire me to make a quilt for my brother. I finished the top...oh... two or so years ago and started the back but just never quite finished the quilt.
I wanted the back to be more modern ... and to use up all the leftover ugly pieces I had in my stash. My brother is an outdoor kind of guy... hunting and fishing etc. I also threw in a few orphan blocks that were in my stash.
SO, check off another UFO from the list :)
Here's my post from WAY back... had just finished the top:
http://www.blogger.com/blogger.g?blogID=6816445089863267415#editor/target=post;postID=2309909011419425883
Here's my post from WAY back... had just finished the top:
http://www.blogger.com/blogger.g?blogID=6816445089863267415#editor/target=post;postID=2309909011419425883
Subscribe to:
Posts (Atom)
Latest projects
I've been working on 4 quilts lately. This yellow one was completely finished a fews days ago. This "square in a square " q...
-
I've started a new quilt! AGAIN! BUT, this time I finished a quilt before I began a new one so I feel okay about it. This is the start...
-
This is my entry into the Park City Girl's Quilt Festival. I made this quilt as a gift to my grandmother on her 100th birthday. I wante...